
-
Digital Flash-Free Bonding: How to Create an Effective Bonding Procedure in a Fully Digital Workflow
Isabelle Savoye, DDS, MS-
 Pictures 1-3:Treatment planning and virtual bracket placement with the 3Shape OrthoAnalyzer software
As orthodontists, we believe that proper bracket placement offers a great advantage in our fixed appliance treatments. Being assured that our brackets are precisely placed leads to a better treatment outcome. Shortening the length of the appointment for the bracket placement will also improve the satisfaction of the patient.
With the evolution in digital technology, it is possible to obtain all of these advantages because it allows the orthodontist full control over every single step. Combining digital technology with the 3M™ APC™ Flash-Free Adhesive Coated Appliance System on brackets creates clean bonding procedures that can further reduce the instance of bonding failures.
A five-step process
Digital flash-free bonding contains five steps: scanning, planning, producing the tray, loading the tray and bonding the brackets.¹Creating the tray in your practice requires an investment in a 3D printer and corresponding material but and it can provide the practice full control of all steps in the bonding process. The orthodontist should decide whether the practice is better suited to print these trays¹ or to work with a lab that provides the trays.
The first step in this procedure is to scan the teeth of the patient and import the scan into the digital software. In our office, we use the 3Shape TRIOS® 3 Pod Intraoral Scanner and we import the models into the OrthoAnalyzer 3Shape Software. You can minimize steps by going to the control panel of your software and downloading your wires and brackets. For the bracket placement, we use the proper workflow. This is your second step. You will have the possibility to choose your arch wire and to place your brackets with all the bracket and teeth adjustments you prefer. (Pictures 1-3)
-
 Pictures 10-13: 3M™ APC™ Flash-Free Adhesive brackets into the tray.
Once you validate your bracket position, the third step is to create an indirect bonding tray using the 3Shape Software of Appliance Designer. We define the spline of the tray, create a bar and subtract the model (picture 4-8). Only the tray will be printed by the 3D printer.
For the the material, a biocompatible Class I material that is clear and flexible (picture 9) can be used.
Using this specific shape of the tray and blocking out the brackets digitally will provide a firm tray where the brackets will not move during the placement of the tray. During the vertical insertion of the brackets into the tray, it is important not to damage the flash-free cushion. (Pictures 10-12)
After loading, which is the fourth step, we keep the loaded tray in a black box. APC™ Flash-Free Adhesive coated brackets are loaded into the trays on the day or the day before the bonding day. (Picture 13)
-
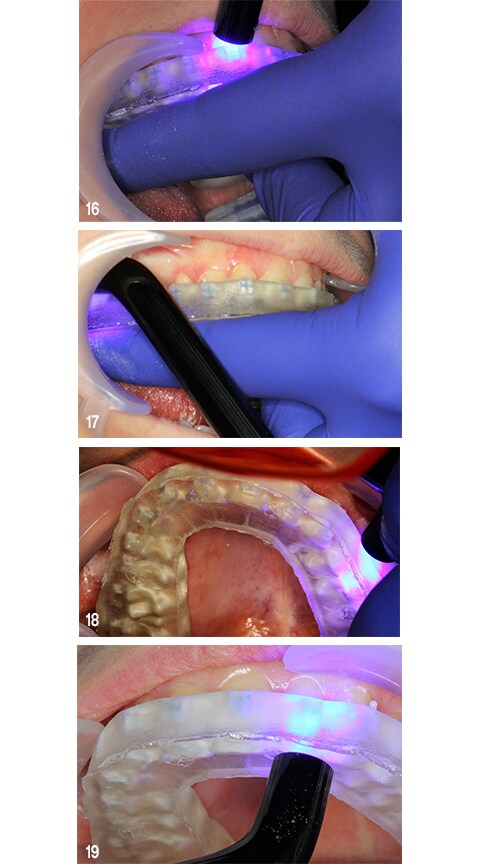
On the day of the bonding, step 5, do the usual: clean the teeth of the patient, dry them and apply the 3M™ Transbond™ Plus Self Etching Primer* and perform a gentle air burst (picture 14-15).
This allows you to push the tray over the teeth. You will need to use some pressure to ensure that the tray is well in position. Once you are certain of the position, you can light cure the brackets through the transparent tray (picture 16-19).
Removing the tray is a very easy procedure as the material should not create debonding of the brackets (picture 20-23).
Using the APC Flash-Free Adhesive coated brackets means that there is no bonding flash around the brackets. After this, you can easily rinse the teeth and place your wire and elastomers (picture 24).
Conclusion
As an orthodontist, it is important to know that you have different options. There is no need to do all the five steps. Step two and three can be outsourced to your dental lab. It is possible to collaborate with your lab to make some adjustments into the bracket placement, if needed.With digital advancements such as digital scanners, planning software, 3D printers and APC Adhesive coated brackets, we create a very powerful workflow that makes the indirect bonding protocol much more attractive.
References
1.Solid, David. Digital Flash- free Bonding: An Evolutionary step in Bracket Placement. 3M Innova Vol XXV No.2
*Please refer to the 3M™ Transbond™ Plus Self Etching Primer" Instructions for Use for additional instructions
Use digital scans to either create customized bonding trays or work with a lab to provide trays

Bonding tray creation with the 3Shape Appliance Designer software

3D printed bonding tray

After cleaning and drying the teeth, apply 3M™ Transbond™ Plus Self-Etching Primer

-


Receive Innova via Email
Don't miss an issue! Subscribe to receive Innova via email as soon as it becomes available.
Thank You For Signing Up
Thank you for your subscription! Innova is a relevant and educational source for orthodontic solutions and treatment options from 3M Oral Care.
Please check your email for the most current issue of Innova.
Our Apologies...
An error has occurred while submitting. Please try again.